Odoo Integration with Middleware (Job Queue)
- Bernard Bryan Hayashi
- Mar 11
- 7 min read

OCA Job Queue module can conveniently act as middleware to integrate Odoo with other third-party system.
What is a Job Queue?
A Job Queue is a system that allows certain operations to be executed asynchronously in the background, rather than immediately during a user request. Instead of running time-consuming tasks directly in the main application process, the task is placed into a queue and processed later by a background worker.
When a job is added to the queue, it waits its turn until the worker picks it up for execution. Each job runs in its own database transaction, ensuring that it does not interfere with other operations and can safely succeed or fail independently. This mechanism is especially useful for tasks that require significant processing time or external communication, such as:
Processing large batches of data
Importing or exporting large datasets
Synchronizing data with external systems
Performing heavy background calculations
By offloading these tasks to a queue system, the application remains fast and responsive for users, while background processes can be set to either run immediately or be run later on. The main point would be making the system continue to run efficiently without blocking normal operations. In summary, Job Queues help improve performance, scalability, and reliability by separating heavy processes from real-time user interactions.

In the next section of this blog, we will explore how Job Queues can be used to synchronize data between Odoo and external systems. We will discuss how background processing helps ensure reliable data exchange while keeping the main application responsive.
Job Queue Creation & Flow
When discussing data synchronization, one of the most common starting points is partner (contact) synchronization. In this example, we will begin by creating a new partner record in Odoo, as shown in the image below. To enable synchronization, we implemented a customization that automatically creates a Job Queue whenever a partner record is created. This Job Queue is responsible for handling the synchronization process with the external system in the background.
Additionally, the Job Queue can be configured to trigger not only when a partner is created, but also whenever the partner record is updated or modified. This ensures that any changes made to the contact information in Odoo can be automatically synchronized, keeping data consistent across systems.

The created Job Queue can be seen in the image below along with its associated details. As shown, the job is currently in a “Pending” state, meaning it is waiting to be processed by the worker. Once the worker picks up the job, it will be executed asynchronously in the background to perform the synchronization process. The synchronization logic can be implemented in various ways depending on the integration requirements, such as through database queries, API calls, or other custom code.
All of this logic is defined within the “Task” field, which allows developers to customize how the synchronization should be executed based on the specific needs of the system integration.

The next aspect of Job Queues we will discuss is Priority. In real-world scenarios, a system may handle multiple types of data synchronization, such as partners, quotations, invoices, payments, and more. When large volumes of jobs are generated—sometimes even thousands or millions—it becomes important to control which jobs should be processed first. The Priority field allows you to define the importance of a job. Jobs with a lower number (closer to 1) are treated as higher priority and will be executed earlier, while jobs with a higher number (up to 10) are considered lower priority and will be processed later. This helps ensure that critical operations are handled before less important tasks.
Another useful field is “Execute Only After.” This option allows you to specify the earliest time when the job is allowed to run. For example, you may want to schedule certain jobs outside of peak business hours to avoid system load during busy periods. By setting this field, the worker will wait until the specified time before executing the job. With these configurations, even if a large number of Job Queues are created, the system will still manage them efficiently by checking both the priority level and the execution time before processing each job.
Finally, the User ID field records which user triggered the action that generated the Job Queue. This helps maintain traceability and auditing, allowing administrators to easily track who performed the change that initiated the synchronization.
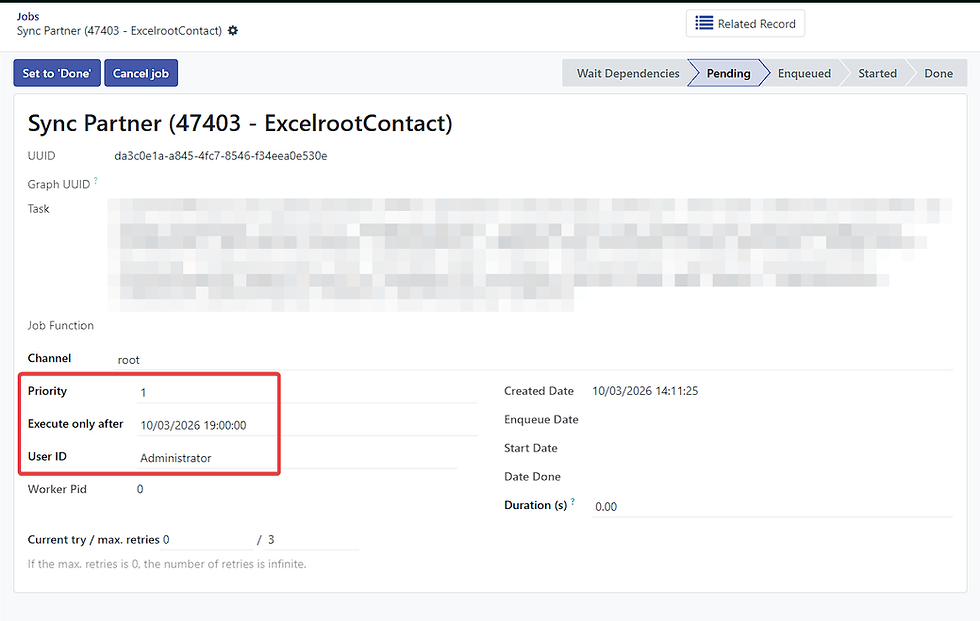
On the right-hand side of the Job Queue form, several fields provide information about the timing and execution details of the job. The Created Date indicates the exact date and time when the Job Queue was generated in the system. Below that is the Enqueue Date, which represents the moment when the job becomes ready and is placed in the queue to be processed by the worker. Next, there are three fields that help track the execution time of the job:
Start Date – The date and time when the worker begins executing the job.
End Date – The date and time when the job execution is completed.
Duration (s) – The total time taken to execute the job, measured in seconds.
These fields are useful for monitoring job performance and troubleshooting, as they provide clear visibility into how long each job takes to run and when it was processed.

After all the required information is prepared and the job has been placed in the queue, the Job Queue will be executed by a background worker. In Odoo, this background process is handled by what is called a worker. Workers continuously monitor the queue for jobs that are ready to be executed. When a worker becomes available, it will pick up the next eligible Job Queue based on factors such as priority and scheduled execution time.
Once a worker starts processing a job, it will run the task until the job reaches a final state, either Done (successfully completed) or Failed (an error occurred during execution). After finishing that job, the worker will then proceed to the next available job in the queue, ensuring that all queued tasks are processed sequentially and efficiently.
This background processing mechanism allows heavy or time-consuming operations to run without interrupting normal user activity in the system, helping maintain overall application performance and responsiveness.

Retriable Job
Knowing systems anything can be happened, like network issue, system is being restarted, or any other inconvenient or human error can be happen that prevent a job being successfully run. In order to cater this using job queue we can make it to auto retry a job queue into a certain amount of max retries with its own interval (eg: after 10 mins) as example here before running it will show current try is still 0

The image below shows an example of a Job Queue that has been executed for the first time but encountered an error during processing. When a Job Queue fails, the system does not immediately stop trying to execute it. Instead, the job is automatically returned to the “Pending” state so that it can be retried later. In this example, the job is configured to retry after 10 minutes from its initial execution.
Each time the job is retried, the Current Try counter will increase. In the screenshot, the field “Current try / max. retries” shows 1 / 3, which means the job has been attempted once out of a maximum of three allowed retries. This max retries can always be customizable to any numbers or even infinite try. When the scheduled retry time is reached, an available worker will pick up the job again and attempt to run it. If the job fails again, it will be placed back into the queue and scheduled for another retry, increasing the attempt counter each time.
This retry process will continue until the maximum number of retries is reached. If the job still fails after reaching the configured retry limit, the Job Queue will stop retrying and its status will be marked as Failed. The Result section at the bottom of the job form records the error message or execution output, which helps developers and administrators understand the cause of the failure and troubleshoot the issue.
This retry mechanism helps ensure that temporary issues, such as network interruptions or external API downtime, do not permanently block the synchronization process.

Failed Job Queue

The image above shows a Job Queue that has reached its maximum retry limit and is now marked as “Failed.”
As seen in the current try / max. retries field, the job has reached 3 / 3, meaning it has already attempted to run three times, which is the configured maximum number of retries. Since the job continues to encounter errors during each attempt, the system stops retrying and automatically changes the job status to Failed.
Once a Job Queue reaches this state, it will no longer be executed automatically by the worker, and manual intervention may be required to investigate and resolve the issue.
At the top of the form, several action buttons are available to manage the failed job:
Job Requeue – Places the job back into the queue so it can be executed again.
Set to “Done” – Manually marks the job as completed if the action has already been handled outside the queue process.
Cancel Job – Cancels the job entirely, preventing it from being executed again.
You may also notice that the Date Done and Duration (s) fields are not filled. This is because the job never completed successfully, so there is no final execution time or duration recorded.
The Result section at the bottom of the form provides the error message or execution output, which can help developers or system administrators identify the root cause of the failure.
As an additional improvement, the system can also be configured or customized to send email notifications whenever a Job Queue is marked as Failed like below for example. This allows administrators or support teams to be immediately informed when a synchronization or background task encounters an issue, enabling faster troubleshooting and resolution.

Related action / record
Lastly, at the top middle of the Job Queue form, there is a “Related Record” button. This button allows users to quickly navigate to the record associated with the Job Queue.
Each Job Queue is typically created as a result of an action performed on a specific record in Odoo. In this example, the job was generated for a Partner (Contact) synchronization, so clicking the Related Record button will redirect the user directly to the corresponding Partner/Contact record.
This feature is especially useful for troubleshooting and monitoring integrations. If a Job Queue encounters an issue or requires verification, administrators or developers can easily access the source record that triggered the job without having to manually search for it in the system.
By linking Job Queues to their related records, Odoo provides better traceability and easier navigation, making it simpler to manage background processes and understand the context behind each job.


Comments